Thursday, February 6, 2020

Learning about the novel coronavirus outbreak


Singapore reported 4 cases of local transmission of the novel coronavirus yesterday. Hand sanitizers and masks are sold out islandwide. The death toll in China continues to rise. The news reports keep pouring in. Given the deluge of information and alarming reports, it is normal to feel anxious and worried. I think our kids are feeling it too, as they try to grapple with bits and pieces of information about the outbreak, while trying to follow instructions to wear masks and wash their hands.

As I chatted with the hubs over dinner about the situation a week ago, I realised that the kids were trying to understand what was happening, but were finding it hard because all they had were snippets from our conversations at dinner. That was when I decided I had to be intentional about discussing with them about the outbreak. I started sharing about the discussions we had with the kids, and the resources we used over on my IG account, and the response I received was overwhelming. Many wanted me to do a blog post, which makes for greater accessibility and easier reading, so here I am, writing in my almost extinct blog. 

Knowledge is power. In this case, a child that is armed with understanding would be better able to think through and process the news rationally, and manage their feelings of anxiety or stress about the situation. Here are some things you could discuss/do with your kids:

For the preschoolers:
- Explain to them (in simple terms) about the outbreak in China, and how it has spread to other countries. Borrow and read books on microbes (I especially like the book "Tiny" by Nicola Davies).

- Help them to understand that some germs cause disease, and that we can take steps to limit the spread of germs. You could download and print a pictorial guide to discuss with the kids, such as this really cute one on @dumo.art (this is in English and Chinese), or this one by local artist @weimankow. If your kids prefer an animated version, here's a pretty good video on how germs spread:


- You could also try demonstrating how germs spread, such as using glitter glue on hands as shared by IG mamas @2mamas4kids over in this post, to drive home the importance of regular hand washing.

- Have them look up affected countries on a world map/globe. (J3 and J4 learnt how China is the country that is shaped like a chicken, and they hunted for other countries on the map.)

- Give them time to process the information. They may even incorporate parts of what they have learnt into their play, as a way of trying to deal with all they have learnt, and that can be used as a springboard for further discussions with them. In our case, J3 and J4 spent time playacting being sick with the virus, and visiting the hospital. 

For more ideas, hop over to these IG mamas' posts:
- Sing Yun (@playfull.sg) shares her learning unit in this post.
- Joey (@playlexue) lists various useful bilingual terms relating to the virus here.
- Jasmine (@3mm.montessori) shares some activities to try for kids under and above 6 years old in this post.


For the primary schoolers:
Give the kids hard data and facts, and discuss the news with them (BBC has a pretty good visual summary here). I find that many kids would like to try to make sense of what is happening, but are not given the information or tools. My older boys especially jumped at the opportunity to wrestle with big numbers and ideas, and I learnt that kids are capable of thinking more deeply, if we are able to given them the info and guidance that they need. This in turn, helps them to think though the situation rationally, and deal with any anxiety or fears that they are feeling (in a sense, it's a little like shining a light to show them that the spooky shadow in their room is just some clothes hanging up on a hook). Here's some of the things we dived into:

Science: Understanding how things work in the outbreak
We read about microbes and watched this video to learn about germ theory. (More info and discussion questions on the topic can be found here.) Those in Primary school would also learn about microbes in their Science lessons, but not much is covered about infectious diseases, so reading up beyond the syllabus would be helpful in adding to their understanding. 


The older kids learnt about how the virus jumped from animals to infect humans (this video is great for explaining how that jump is made). We also looked at how the isolation rooms in the National Centre for Infectious Diseases (NCID) work, from the use of negative pressure, HEPA filters and ultraviolet rays, to the function of double doors and personal protection equipment (The Straits Times has an excellent graphic on this, which you can view here.). Learning about these things helped to reassure them that things were still under control.

Language: Finding meaning in reports and articles
Prior to this the kids had read very little news reports, so the different style of writing required me to do some explaining for more complex sentences. We looked up difficult words so they could understand better, such as "pandemic", "epidemic", and other scientific terms. 

Geography: Getting a sense of where and the range of the outbreak
We looked up countries and cities that were mentioned in newspaper articles. They noted countries linked to China by land, and how these borders were closed. The kids saw how air travel made the virus spread quickly all over the world. (A useful resource would be Channel News Asia's map that tracks the number of cases around the world.)

Math: Getting an idea of the size and the severity of the outbreak
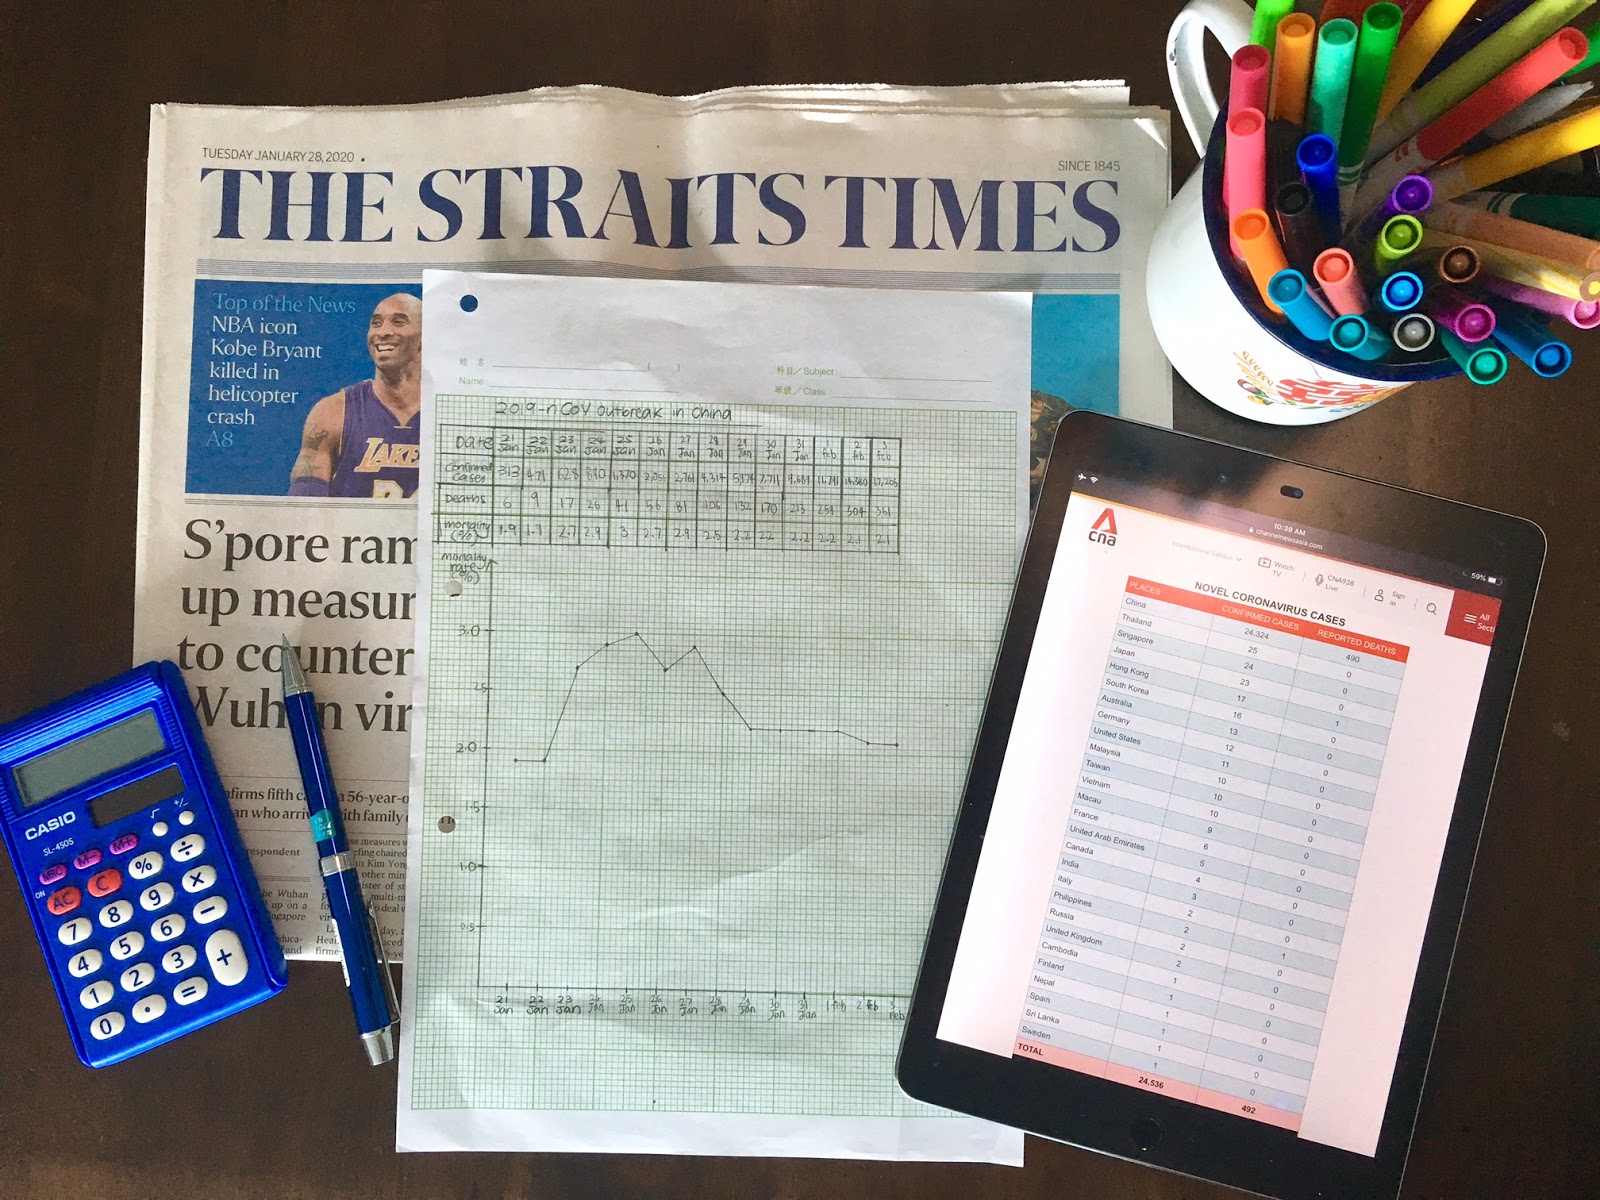
The news kept reporting the number of cases and the death toll, but little was mentioned about the mortality rate and the trends observed. J1 worked on getting the data into a table, and learnt how to calculate the mortality rate, and then plotted the rate on a graph to see if there was a trend. We also compared it against SARS and MERS and discovered that nCoV was less lethal (with a mortality rate of approximately 2%, versus SARS 10% and MERS 34%). We referred to the graph of number of cases and deaths over on this Channel News Asia page (you need to scroll to the bottom to see it).  

J1 learnt so much along the way as we crunched numbers. He learnt how looking at overall numbers does not give a proper basis of comparison, how data can be represented in tables but are limited in their ability to show trends, how graphs can help one to pick up patterns, how different graphs are used to represent different types of data. He also felt less anxious after discovering that the mortality rate was much lower, and that the rate actually dropped after an initial spike.

This was the table and graph that J1 drew. We discussed the reasons for the spike in the earlier days:
Perhaps the virus  was more lethal when it was transmitted from the original source of infection, but became
less lethal with community spread, leading to a dip in the mortality rate. The rate has more or less
remained constant thereafter at around 2%. We also discussed why a less lethal virus might have
greater transmission rates, which results in a greater overall number of infected cases. 


For the tweens/teens:
- For the older kids, take the opportunity to talk about social issues. Discuss with them about how fear arises from a lack of understanding, and results in ugly behaviour such as racist acts. Read together about the wildlife trade in China and its challenges (this is a good read for starters). Showcase our heroes, from our SAF servicemen packing masks for distribution, to the doctors who worked through the SARS epidemic previously. 

- Discuss with the older ones about how we need to be discerning and evaluate the reliability of the news we read. For a good read on the misinformation being spread about the virus, please click here. What I am planning to do is to pull out some fake news articles, and teach the kids how to check the reliability of the information. Here's a good video on how to do so:


- Some kids may also be interested in researching about the history of infectious diseases, as well the advances made in medicine to combat them. This video on pandemics gives a good overview of pandemics across history, and is also accompanied by review questions and more information which you can access here. The research could be summarised into a timeline.


All in all, we need to be intentional about giving our kids the necessary skills and understanding to help them to process what has been happening, and I hope the resources above might be of help. That being said, we also need to remember that they are children, and not overburden them with too much information. Some kids may get more anxious when reading the news, while others relish the additional info, so it is up to us as parents to discern how much is beneficial for them, and shield them from the rest. For Christian parents, do also take time to pray with them about this, and commit their fears into His hands. May we have wisdom, and be able to act in love during this time of crisis!

PS: I will continue to share useful resources or activities in my IG stories over @justtey, so do hop over for more!

Wednesday, June 13, 2018

Cooking Casebook: Sour Cream Noodle


It's been a few months since I've written! The reason for that warrants it's own post, but for now, let me share one of our go-to recipes for busy days: Sour Cream Noodle. I've adapted my own (lazy) version from this original recipe, which guarantees me a quick meal from scratch in less than an hour. This is simple enough that my kids can help to cook it, and they love this dish!

Sour Cream Noodle
(Serves 5-6)


Ingredients
300g minced beef
1 can whole, peeled tomatoes OR 1/2 a jar of passata 
1/2 cup of sour cream
1 cup of cottage cheese (I just use the entire container)
1 cup of grated cheddar
1/2 cup of green onions (or more if preferred)
Pasta (about 4 servings worth, this is nice with pappardelle, or cook with penne/fusilli/linguine if you need the meal to be egg-free)
Olive oil/butter
Salt & pepper


Method:
1. Preheat oven to 180ºC. Brown the minced beef in an oven-safe pot (I like using my Le Creuset Buffet Casserole for this, or you can also use a French oven too) in some melted butter or oil. As the beef browns, slice up the green onions & cook the pasta (in a separate pot) until al dente.


2. Add salt & pepper , and the canned tomatoes/passata to the beef. Stir to mix and leave to simmer.

3. Drain the pasta when cooked. Add the sour cream, cottage cheese and green onions to the pasta and mix well.


4. Remove the oven-safe pot from heat, and top the beef with the pasta. Sprinkle the grated cheddar on top of the pasta.


5. Bake, uncovered, in the oven for 10-15 minutes, until all the cheese is melted. Serve with chilli flakes if you want a spicy kick!


PS: This post is the eighth in a series of posts written in collaboration with Le Creuset Singapore. You can find the entire series of posts here.

Monday, January 22, 2018

Cooking Casebook: Baked fish in lemon cream sauce


These days I've been trying to cook more fish. I'm not much of a fan of fish, I think mainly because I was "forced" to eat a lot of fish during my first two confinements. However, the hubs and the kids love fish, and I have been trying to widen my repertoire of fish dishes.

Thus far, I've only learnt how to do the usual Teochew-style steamed fish, and I struggle with getting fish cooked just right when using the oven (I've been known to cook my fish to death, heh). So I've been experimenting with various baked fish dishes, and recently tried this recipe. The sauce turned out pretty amazing (but I overcooked the fish, because I miscalculated the time!), so I thought  the recipe it was worth tweaking and sharing here!

This dish is great for busy days where you want a light, yet filling meal, and I usually pair the fish with baked vegetables. I toss the veggies (potatoes, onions, carrots, sweet potatoes, etc) with olive oil, salt, rosemary, thyme and a dash of balsamic vinegar, and bake them in the oven at the same time while the fish is cooking, and the veggies are ready in about 35 minutes or so. 


Baked Fish in Lemon Cream Sauce
(Serves 2-3)


Ingredients
2 x fish fillets (we use red snapper fillets)
50g unsalted butter
1/4 cup heavy cream 
2 garlic cloves, minced
1 shallot, minced
1.5 tbsp lemon juice
Salt and pepper
Parsley and lemon slices to serve (optional)


Method
1. Preheat oven to 200ºC. Wash and pat dry the fillets (Note: The fillets must be totally defrosted if frozen, and as dry as possible, as the water content in the fish affects the sauce). Season with salt and pepper.

2. Place the fillets in the buffet casserole (or a baking dish), while melting the butter. Add melted butter, cream, minced garlic and lemon juice into a small pot. Heat gently while stirring, until ingredients are well mixed. (Taste, and add salt to the sauce if you wish.) Pour the sauce over the fish.


3. Sprinkle the minced shallots over the fillets, then bake for 10-12 minutes, or until fish is cooked through (the time depends on how thick your fillets are, ours were baked for 11 minutes).

4. Remove from oven, and transfer the fillets onto plates. Serve with the sauce, along with parsley and lemon slices.


Tips
1. Fish tastes awful if cold, so keep the casserole covered if not serving the fish immediately.

2. The Le Creuset buffet casserole distributes the heat well for even cooking, and the fish will be moist and tender if not overcooked. However, a baking dish will also do.


PS: This post is the seventh in a series of posts written in collaboration with Le Creuset Singapore. You can find the entire series of posts here.

Friday, November 24, 2017

Cooking Casebook: Beef short ribs with pasta


We've been living like nomads since the start of our home renovations, and have been staying either with my parents in SG, or with the in-laws over in Penang. Whatever the case, I know I miss home, and the kids do too. I also miss having our own simple home-cooked meals (though not so much the slaving over the hot stove!), and I can't wait to take out my pots and pans when the dust from the reno has settled (literally!).

Anyway, speaking of cooking, this recipe for beef short ribs is one of my favourite recipes to cook if we want a simple pasta meal, that is yet elegant enough to serve for guests. It's really fuss-free to prepare, tastes great, and best of all, is freezer friendly! It was a modification of this recipe, and I use my Le Creuset French oven in this case, as I find it brings out the flavours better than the slow-cooker.

BEEF SHORT RIBS WITH PASTA
(serves 8-10)


Ingredients
1.5 kg of beef short ribs 
2 tbsp olive oil 
4 tbsp of butter
1/2 cup of red wine
2 cans of whole, peeled tomatoes
3/4 cup of sun-dried tomatoes (those that are stored in oil)
1 small can of tomato paste 
1 large onion, diced
5 cloves of garlic, minced
2 large carrots, cut into thick slices
2 tsp dried basil
2 tsp dried parsley
1 tsp oregano
1/2 tsp dried thyme
1/2 tsp crushed red pepper (optional)
4 tbsp freshly grated parmesan cheese
2 tbsp shredded fresh basil leaves
Salt and pepper
Pasta for serving (we use papardelle)


Method
1. Add and heat the olive oil in a cast iron pot (we use a round, 26cm Le Creuset French oven) over medium-high heat. 

2. Season the ribs with salt and pepper, and add them to the pot. Sear the ribs all over, taking about 1 minute per side.

3. Add the butter, taking care not to let the butter burn.

4. After butter has melted and starts to froth, add the garlic and onions, and brown them for a few minutes. 

5. Add the red wine, tomatoes, sun-dried tomatoes (drain away the oil that they are stored in first), tomato paste and the dried herbs. Cover and cook for 4 hours on low heat, stirring occasionally. 

6. Add and stir in the carrot slices, and cook for an additional hour. If the sauce appears too dilute, remove the lid during the last hour of cooking. (Leave the lid on if the sauce is the right thickness, and add a splash of water if you feel the sauce is too thick.) 

7.  After 5 hours of cooking (you can cook it even longer if you wish), remove the pot from heat, shred the meat and remove the rib bones. Stir in the parmesan cheese and fresh basil. Season with more salt and pepper if necessary.

8. Cook pasta until al dente, and drain. Serve the sauce with the pasta. (This sauce goes amazingly well with pappardelle!)


Tips
1. Beef short ribs can be rather pricey, so we buy the frozen ones from the wet market, as they are relatively cheaper.

2. You can replicate this recipe in the slow-cooker, just that it is more troublesome, since you would need to sear the ribs in a pot before putting them into the slow-cooker. I also find that the flavours develop more if you use the French oven instead of the slow-cooker.


PS: This post is the sixth in a series of posts written in collaboration with Le Creuset Singapore. You can find the entire series of posts here.

Wednesday, October 11, 2017

Cooking Casebook: Asian beef stew


We love our traditional beef stews. However, the hubby always has a preference for Asian food, so this Asian beef stew (modified from this recipe) gets his thumbs up! This stew is really easy to prepare, and I love how versatile it is: you can serve it with noodles, or eat it with rice. 

ASIAN BEEF STEW
(serves 6 if eaten as a main, 8 if served with noodles or rice)


Ingredients
2 large onions, peeled
5 cm piece of ginger, peeled
5 garlic cloves, peeled
3 tbsp sesame oil
250 ml Chinese cooking wine
5 tbsp soya sauce
3 tbsp oyster sauce
3 tbsp brown sugar
4 tbsp black rice vinegar
1 litre of beef stock (or just use water, and add another 2 tbsp of oyster & soya sauce each)
2 cinnamon sticks
2 star anise
1 kg of beef shin, chopped into cubes
3 carrots, chopped into thick slices


Method
1. Preheat the oven to 150ºC.

2. Blend the onions, ginger and garlic in a blender or food processor until finely minced.

3. Heat the oil in a large pot (we use our 26 cm Le Creuset round French oven as it allows for stovetop to oven cooking). Fry the onion, ginger and garlic mixture until golden.

4. Add the beef and continue to fry for another 10 minutes. 

5. Pour in the Chinese wine, followed by the stock (or water), black rice vinegar, soya sauce, and oyster sauce.

6. Let the mixture come to a boil. Add the sugar as well as the cinnamon sticks and star anise.

7. Stir, cover the pot, and cook in the oven for 2.5 hours.

8. Remove the pot from the oven, and add the carrots. Add some water to the pot if the stew is drying out. Return the pot to the oven to cook for at least another 30 minutes to an hour, until the beef is tender. 

9. Serve with noodles (we usually pair it with hibiscus noodle), or with rice.


Tips
1. We add the carrots later so that they do not become too mushy. If you are intending to freeze a portion, remove the carrots as they become soft when reheated. This recipe is freezer friendly!

2. You can add a dash of five spice powder to the beef for additional flavour.


PS: This post is the fifth in a series of posts written in collaboration with Le Creuset Singapore. You can find the entire series of posts here. We were sponsored some of the products pictured for purpose of these posts, and no monetary compensation was received.

Tuesday, September 5, 2017

Cooking Casebook: Chicken in Milk


Hello September, I can't believe you are here! Life has been full as usual, but I am popping in again to share one of our favourite chicken recipes. This recipe by Jamie Oliver (it's hard to go wrong when you use a JO recipe!) has the most unlikely combinations: milk and chicken. However, slowly cooking the chicken in milk, lemon zest and herbs gives you the most amazing sauce, and I especially love this recipe as it's easy and fuss-free! The kids love this, and the best thing about this dish is that it is freezer-friendly and versatile. My only issue with it is that we never had enough sauce to go around, so I've adapted the recipe in a few ways. Here's our version!

CHICKEN IN MILK

Ingredients
1 whole chicken, cleaned
2 whole garlic bulbs
1 handful of fresh sage
A few sprigs of fresh rosemary
A few sprigs of fresh thyme
2 lemons, zested
1/2 stick of cinnamon
Sea salt
Black pepper
Milk (600 ml)
Olive oil


Method
1. Preheat the oven to 190ºC.

2. Season the chicken with salt and pepper (you need to be generous with the salt).

3. Heat a small amount of olive oil in the pot. I used my Le Creuset 26 cm round French Oven, as this fits an entire chicken, and allows me to do stove to oven cooking. Fry the chicken until golden, turning to get an even colour. (Note: If you are hard-pressed for time, you can skip this step, but it helps with increasing flavour.)

4. Add the cinnamon, the sage, rosemary, and thyme leaves, lemon zest, garlic bulbs, and 500 ml of milk.


5. Cook in the oven uncovered, for 1 hour 30 minutes (or until the chicken is cooked through). At the 30 minute mark, add an additional 100 ml of milk into the pot. Bast the chicken with the milk sauce every 30 minutes.


6. Serve the chicken with the milk sauce. We love it with potatoes or pasta!


Tips:
1. This recipe is freezer friendly. To save space, shred the chicken off the bones before freezing.


2. I usually defrost the frozen batch and reheat it with the milk sauce, while adding veggies such as capsicum and corn. We serve it over freshly cooked pasta (Note: Pasta is not freezer friendly and should always be cooked fresh!). We love this with pappardelle!


PS: This post is the fourth in a series of posts written in collaboration with Le Creuset Singapore. We were sponsored products for purpose of these posts (but we purchased the larger French oven pictured in this post, before this collaboration). No monetary compensation was received.

Wednesday, July 26, 2017

Cooking Casebook: Beef stew


I admit, sometimes it can be quite a drag to have to cook almost every day for the family. It is hot, hard work, which is not made any easier when you have to walk around with a toddler glued to your leg. But then, there are days where I see this, and all the (literal) sweating over our meals doesn't seem that bad after all:


The hubs was around that evening, and had brought the kids to the playground. Upon returning home, the boys ran into the house, sniffed the air, and asked me "what is that yummy smell?". And they all ran to the oven, and spent the next 10 minutes just inhaling the amazing aroma of the beef stew that was slowly simmering away inside. Seeing them standing at the oven reminded me of why I cook: because food can be a love language, and it is another way of showing my family that I care.

Anyway, this is our go-to recipe when I want a hearty beef stew. It is adapted from this recipe by Jamie Oliver, and this is easy to prep if you have a French oven, since it can go from stove top to oven and everything is cooked in one pot. It's also freezer friendly too!


BEEF STEW
(Serves 6)

Ingredients
2 onions, diced
1/2 a butternut squash, deseeded and chopped into large pieces
5 carrots, chopped into 1 inch thick slices
500g potatoes, peeled and chopped into halves or quarters
1 kg of stewing steak, cut into 2 inch chunks
1 cup of red wine
2 cups of beef/vegetable stock
1 knob of butter
1 tbsp all purpose flour
4 tbsp tomato puree
A few sprigs of fresh sage, leaves plucked
A few sprigs of rosemary, finely chopped
1 clove of garlic, minced
1 lemon, zested (optional)
Olive oil
Black pepper
Sea salt


Method
1. Preheat the oven to 160ºC.

2. Heat a little olive oil and the butter in a cast iron pot (we use our 26 cm Le Creuset French oven) on medium heat.

3. When the butter has melted, add the onion and sage leaves. Fry for 3 to 4 minutes.

4. Season the meat with salt and black pepper, toss the meat in flour, and add it to the pot. Fry for another 3 to 4 minutes.

5. Add the squash, tomato puree, wine and stock, and stir. Season with a pinch of sea salt.

6. Bring the ingredients to a boil, cover the pot, and place it in the oven for 3 hours. At the 2 hour mark, give the stew a stir and add a little water if you find that the stew is drying out.

7. After 3 hours, add the potatoes and carrots, stir, and return the pot to the oven. (Again, if you think the stew is too dry, add some water.) Continue cooking, covered for another hour. (We like our potatoes and carrots with some "bite", hence we add them much later. Should you prefer them softer, add them in at the 2 hour mark.)

8. Mix the lemon zest, chopped rosemary and minced garlic. Sprinkle over the stew before serving. We love having this stew with garlic bread, or slices of baguette on the side. Sometimes we mix in some cooked pasta.


 Tips
1. We use our Le Creuset French oven to cook this, as it allows us to cook everything in one pot. The lid helps to seal in the flavours during the cooking process, and washing up is much simpler with just one pot!

2. You can try adding slices of sweet potato along with the carrots and potatoes. It helps to add sweetness and flavour to the stew.

3. This stew is freezer friendly, but the potatoes and carrots can become mushy after defrosting. As such, it might be better to just freeze the meat and the stew, and add fresh veggies when cooking a frozen batch.

PS: This post is the third in a series of posts written in collaboration with Le Creuset Singapore. We were sponsored products for purpose of these posts (but this French oven was our first ever cast iron pot that we purchased, way before this collaboration), and no monetary compensation was received.

Tuesday, June 13, 2017

Cooking Casebook: Chicken Parmesan


These days, I've been trying to reduce our red meat intake, and I'm trying to improve on my repertoire of chicken and fish dishes. However, I must admit, I'm not too good in cooking chicken, unless it's in a soup dish. I tend to overcook it (same goes for fish!), and I find it hard to get it tender and moist.

One day though, I was browsing for recipes and ideas for cooking chicken, and came across this one for Chicken Parmesan, which promised a crispier crust. I looked at the ingredients and decided to try it, since it looked like something the kids might enjoy (who can resist all that melted cheese!). It turned out to be a winner, with a yummy crust and tender meat inside, and everyone loved it. So here's sharing our own modified version of the recipe:


CHICKEN PARMESAN
(Serves 4)

Ingredients
4 skinless, boneless chicken breast halves
2 eggs
2 cups of panko bread crumbs
3/4 cup of grated Parmesan cheese
2 tablespoons all purpose flour
1/3 cup olive oil 
1/2 cup of tomato sauce
1/2 cup fresh mozzarella, cut into cubes (not shredded)
1/4 cup chopped fresh basil 
Salt and pepper


Method:

1. It is best to season the chicken breasts the night before with salt and pepper. Depending on your preference, you may also want to cut each piece of meat into half or thirds.

2. Preheat oven to 230ºC.

3. Place chicken pieces in a large ziplock bag and seal the bag. Pound the chicken with a meat mallet to a thickness of about 1 cm.

4. Beat eggs in a bowl.

5. Mix bread crumbs and 1/2 cup of Parmesan in another bowl.

6. Sift flour over the chicken pieces, evenly coating both sides.

7. Dip the chicken in the beaten eggs, then transfer the chicken to the bread crumb mixture, coating both sides. Repeat for each piece of chicken, then set aside for about 15 minutes.

8. Heat 1/3 cup of olive oil in a large skillet, or buffet casserole (the latter allows you to do all the cooking in one pot) at medium high heat. Fry chicken pieces until golden, which requires a few minutes on each side.

9. Transfer chicken pieces into a baking dish (if you are using the buffet casserole, just drain away the excess oil). Top each piece with tomato sauce, mozzarella, and basil, then sprinkle a few tablespoons of Parmesan cheese as well as a tablespoon of olive oil.

10. Bake in the oven until cheese is browned and bubbly, and chicken is cooked through, which would take approximately 15-20 minutes.

11. Serve on top of pasta, or in our case, fried potato slices.


Tips:

1. If you are cooking this for kids, you may want to chop the chicken breasts into smaller pieces (thirds or quarters) before coating them. In general, I find my kids love this dish because of the crust, so the smaller the pieces, the more crust there is for them!

2. Using a pot that can go from stovetop to oven is helpful. In our case, using the Le Creuset buffet casserole meant I could fry the chicken on the stove, and then pop the pot in the oven directly. This was more convenient, and also meant less washing up to do!


PS: This post is the second in a series of posts written in collaboration with Le Creuset Singapore. We were sponsored products for purpose of these posts, and no monetary compensation was received. Stay tuned for more family friendly recipes to come!

Wednesday, May 10, 2017

Cooking Casebook: Easy BBQ pork ribs


I know, I know, I've been missing from this space for a really long time! Life has been really full, and we've been busy with the regular going-ons of everyday life. And speaking of busy, I've been spending a fair bit of time in the kitchen cooking our meals, and these days I'm very blessed to have the boys help out in the kitchen with the cooking.


Having so many little cooks trying to help means I'm always on the look out for easy to prepare dishes that appeal to everyone's tummies. This recipe for oven-baked ribs happens to be one of them. It's straightforward, doesn't require much preparation or monitoring, and the steps are simple enough for the kids to help (that's them in the photo mixing up the rub for the ribs)! I always get requests for the recipe every time I post a photo of these on Instagram (you can follow our family cooking exploits over @justtey), so I decided I should just write up the recipe here. Our recipe is adapted from this one, and is the main reason why we no longer order baby back ribs when we are dining out (because it's much cheaper to cook your own!).


EASY BBQ PORK RIBS
(Serves 4)


Ingredients
1 kg of baby back ribs
1/3 cup of brown sugar
1/2 teaspoon of salt
4 cloves of garlic
3/4 cup of BBQ sauce

Method
1. Preheat oven to 160ºC.

2. Mince the garlic. (We usually use the chopper that comes with our hand-held blender, and the kids love blitzing the garlic!)

3. Mix garlic, sugar, and salt together to make the rub. Apply rub on all sides of the ribs.


4. Place ribs, meaty side down, in a cast-iron pot (we use our Le Creuset buffet casserole, but a French oven should work too).

5. Bake with the cover on, for 2 hours and 15 minutes. Remove from the oven and drain the excess liquid. Increase the oven temperature to 180ºC.


6. Brush on the BBQ sauce on top, then flip the ribs and brush the other side.


7. Return the ribs to the oven, and bake uncovered, for another 20-30 minutes, depending on the size of the ribs (just keep one eye out to see that they do not get burnt!).

8. And you are done! Serve with pasta or potatoes (in this case we paired the ribs with hasselback potatoes and steamed veggies), and enjoy!

They really love the ribs, and this kid can eat 2 to 3 ribs in one sitting!

Some points/tips to note:

1. On buying ribs: It would be best to use baby back ribs for this recipe, as those are more tender. We used a different cut in the pictures, and we find that the meatier and leaner cuts tend to become dry during the cooking process (you can read more about the different cuts here). We purchase our ribs from the wet market, as we find that the pork ribs from the supermarket tend to have a strong smell. I usually ask our butcher to chop the ribs into individual pieces, as I want the flavour of the rub to go in during the cooking process. However, you can also cook the ribs together as one slab, and cut them into individual pieces later, before brushing on the BBQ sauce.

2. On the cooking process: The original recipe required the ribs to be wrapped in aluminium foil, but I was cautioned by some readers about the use of aluminium foil in cooking. Hence, I adapted this recipe to use our Le Creuset buffet casserole instead, and it does a good job sealing in the moisture and flavour during the cooking process. I have yet to try it, but I think a French/Dutch oven would work as well. For those without, you can use a baking tray and cover the top with aluminium foil, however, do note you would probably need to lower the initial baking temperature to 150ºC.

3. On the use of garlic: The original recipe calls for the use of garlic powder, but we've stopped buying garlic powder, as I find it clumps up quickly in storage due to the humidity in SG. I love how freshly minced garlic gives more flavour to the ribs!

4. On brushing the sauce: If your kids are helping out, a basting brush with a longer handle would be preferred, as the ribs are very hot! Brushes with silicone bristles are also better, for the same reason, and our Venus basting brush is perfect for the job. The boys love brushing on the sauce, saying that it is like "painting with BBQ sauce"!


PS: This post is the first in a series of posts written in collaboration with Le Creuset Singapore. We were sponsored products for purpose of these posts, and no monetary compensation was received. Do stay tuned for more easy recipes to try with your kids!

Friday, March 10, 2017

Making math fun


Hello March, I can't believe you are here! These days, life has been so full, and it's been hard to find time to do any writing. However, amidst the mess and mayhem of each day, we've been making slow, steady progress with regards to homeschooling, and these days both Junior J and Lil J do a certain amount of seat work on weekdays.

For those who have been reading this blog for awhile, you would know that we've been using Math U See for our main curriculum (you can click here to read more about the curriculum). Math U See has been great for helping them to get a good foundation in Math, but I admit it is pretty dry. Junior J more or less just bulldozes through his math work each day, and he's currently learning multiplication (we are at the Gamma level for Math U See now).

Learning multiplication can get pretty boring, and I felt like math these days was starting to feel like a chore. I really wanted to make math more interesting, so I went searching for ways to make multiplication more fun for Junior J. In my search, I came across the concept of multiplication circles (from this post), which lets kids make patterns based on the times tables, using yarn. It seemed like an interesting way to let the kids practice their skip counting and multiplication (the younger kids can just wrap the yarn by counting in 2s/3s/4s etc without having to memorize the actual numbers for skip counting), so I made our own circle using an IKEA cork coaster and small nails. Most DIY multiplication circles are made using a piece of wood or an embroidery hoop, but I thought a coaster would be easier, since this meant I could push the nails in without needing to hammer them. The older two had fun making the patterns, and I loved that it was a kinaesthetic way of learning how to skip count! (And in case someone asks, the multiplication target circle worksheets pictured above are from this site.)


That aside, I introduced the concept of spirolaterals to Junior J (this is probably suitable for older kids from six and up). Spirolaterals basically are spiral patterns that are drawn using the times table, and different times tables yield different patterns (you can get a good guide to drawing them from this post). Junior J was fascinated, and couldn't wait to work out all his times tables so that he could see what kind of patterns would result! It was really interesting to see the different patterns slowly forming, and the boy really loved colouring them.

And since we were on the topic of spirals, I decided to introduce the concept of Fibonacci numbers for the fun of it. We mapped out the sequence on graph paper and I showed Junior J the spiral that resulted. He was intrigued and was really excited to see how this spiral is found in so many natural structures in nature, and how frequently Fibonacci numbers appear in nature (eg. the number of petals in a flower). (This is a good read if you would like to find out more.)


All in all, we (myself included) had quite a bit of fun working on these activities, and it made learning math pretty fun as well as more meaningful. I'm hoping to do more of such activities in the future!

PS: These activities aside, we've been supplementing our math learning with the Life of Fred books (you can read more here). Life of Fred has been great, since it introduces math through stories, but do note it cannot be a stand-alone curriculum for teaching math. 

LinkWithin

Related Posts Plugin for WordPress, Blogger...