

I've been wanting to write about this for ages! Junior J's party was in January, and we are fast approaching May, so I figured I'd better get down to writing about the party packs we did for his 5th before I totally forget.
His party had a dinosaur theme (see our posts about the games here, and more pictures from the party here), and we decided to go with bags (we purchased these from Art Friend) which we personalized, then filled with stuff. I thought it would be nice to give a bag that the kids could re-use, and these were just the right size to fit a water bottle, a lunch box and perhaps some snacks.
So here's what we did:
1. Wash the bags in the washing machine, just in case. You know, chemicals or whatever, which may affect the stenciling process.
2. Cut out the stencils using freezer paper (many have asked me about where to get this, previously we purchased ours from Cold Storage in Parkway Parade, at the section that stocks ziplocks). Freezer paper is a type of paper that has a waxy finish on one side, and when you iron the waxy side onto fabric it adheres nicely to it, which makes it perfect for fabric stenciling.
Previously when I tried this method of stenciling (see our Father's Day matchy T-shirts here!), I cut everything out using a penknife, which was doable, but still rather tedious. This round, I "cheated" and used the Silhouette Cameo to do the cutting for me. I used the following settings: blade 3, speed 3, thickness 10, with the shiny side stuck onto the mat. As mine was a second-hand machine, the blade was blunt, so I ended up having to cut out half of the words using a penknife (and was rather fed-up because the dino names were so long!), but these were the settings that worked best after some tweaking. If you are using a Cameo to cut the lettering, try to choose fonts that are "thicker". I find the thinner bits might bleed paint, and you don't get such crisp text.
Oh yes, I'm pretty new to this Cameo thing, so I was clueless about how to convert JPEG files into files that the Cameo could read. And I didn't like the dinosaur graphics that were available in the Silhouette store. Most had really intricate designs, which made stenciling tricky. One thing to note for stenciling: if you have sections that have to be blocked off eg. the space inside the letter D, you would need to stick on the little bit of paper inside the D before applying the paint. So lacy, intricate line drawings are a no-no for stenciling, unless you want to fiddle with little bits of paper and a hot iron, which usually guarantees you singed fingers.
Thankfully, I found a dino font which had a dinosaur image for each alphabet (I downloaded it from here), imported it, and just typed text into text boxes to obtain my dinosaur images. (If you want to do this, and have no idea what I am talking about, drop me an email!)
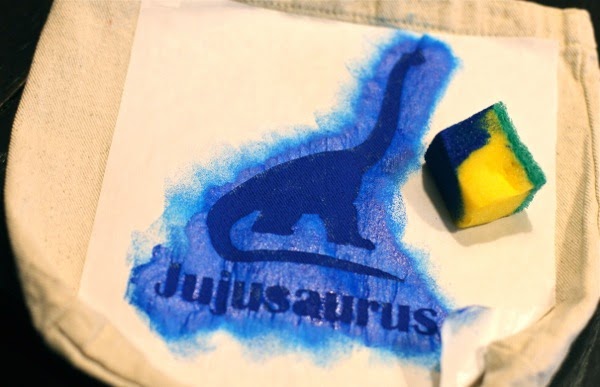
3. Iron the freezer paper stencil onto the bag. Remember its the shiny side that sticks down onto fabric.

4. Place a kitchen paper towel inside the bag, below the fabric you will be painting on, to avoid the paint seeping through to the other side. Using a sponge (I was lazy and used a regular dish sponge!), apply fabric paint evenly unto the stencil.

Don't try this with brushes. I did previously, and had lots of brush hairs stuck in the image, which wasn't nice at all. Also, avoid applying too much paint as the paint might seep through the edges.
5. Leave the paint to dry, then slowly remove the stencil. Then heat-set the image, following the instructions given for your particular fabric paint. And you're done!

One great thing about freezer paper is that you can actually re-use the stencil and iron it onto another fabric. I reused those for Lil J and Junior J's bags and stenciled their party T-shirts with them. Another fun thing to try would be to mix another colour fabric paint gradually as you paint your image, to get an ombre effect, like how we did our T-shirts:

Oh, and if you are curious to know, here's what went into each party bag:
:: Milo and raisins. (I tend to keep edibles to the minimum, since you have to think about food allergies and preferences etc.)
:: Dinosaur stickers, purchased from CraftPlay.
:: A dino scratch art kit, purchased from JuzBaby.
:: A dinosaur identification chart. The kids got to excavate out some dinosaur figures (from Tom and Stefanie) and got to bring those back with them. I snapped photos of all the dinosaur figures, got Junior J our resident dino expert to identify them, and made a little table with some information on each dinosaur. (If you do have a party or learning activity and would like a printable copy of the chart, drop me a note in the comments section, and I'll send it over to you!)

This is brilliant!!!! You are sooo creative!!!!!! I love it!
ReplyDeleteBet the kids love it and I like that your goodie bags are filled with healthy snack, drink and dino fun! I
Well-done YOU!
Can my kids be invited to your party pleasssseee? So much heart and love put into the bags! You had me reading so carefully on the steps. I'll go find freezer paper this weekend :)
ReplyDeleteyes, please I do like to have a copy of the dino chart. Thanks.
ReplyDeleteYi Xuan: Sure! But could I have your email so I know where to send the chart to? ;)
DeleteSuper cool! I actually especially like the look of freezer paper on the bags, even before any paint is added!
ReplyDeleteWHOA!!! This is elaborate WORK MUM! Kudos to your patient and hard work! Your kids are so blessed. This kind of stenciling work is beyond my level of P A t I e n c e..... ; p
ReplyDeleteLovely! I've always wanted to try freezer paper stenciling! :)
ReplyDelete